Storing State & Unit Testing
Published:
Filed under: Rovani's Vue
In the previous post, we built a Minimum Renderable Vue application - which is to say that it outputs text in the browser using Vue, Vite, and TypeScript. Most tutorials would now build on that by creating components and output content using temporary hard-coded data. Instead, this tutorial is going to go in the direction of loading real data, which we will then build components around. I think this is more in line with real-world applications, where you know what the general shape of the data looks like (or at least what the domain is) and getting it loaded into the app is a good first lift.

The second in a series of posts on 'HSMercs Helper From Scratch', a tutorial for recreating HSMercs Helper.
Building an Extensible Vuex Store
Vuex is the defacto standard state management pattern and library for Vue.js applications. It was created by the Vue core team, the repo is in their Github, and the website is hosted under the vuejs.org domain. There are other state libraries out there, but this website isn't complicated enough to need to branch out into something with even more features.
yarn add vuex@^4 typescript@^4 @types/nodeAdd Vuex v4 and TypeScript v4 as dependencies and install them. Prior .ts files we created didn't have any TypeScript nomenclature, so the library wasn't required. Since the Vuex parts that we are about to create will be using strong typing, we need to do some transpiling. The @types/node library brings in TypeScript definitions for Node.
tsconfig.json
{
    "compilerOptions": {
        "module": "esnext",
        "moduleResolution": "Node",
        "esModuleInterop": true
    },
    "exclude": [
        "./node_modules/",
        "./dist/"
    ]
}
This configuration file tells the TypeScript compiler that we want to use the "CommonJS" module, which is what is typically used for Node.js applications. The moduleResolution setting is a strategy for finding the TypeScript file when an import is called, and the esModuleInterop flag fixes a flawed assumption in the original and default way TypeScript treats CommonJS. The excludes are there because we don't want/need the TypeScript compiler touching anything in those two folders.
Most of this, you'll never have to think about ever again, it's just copy/paste from project to project.
Vuex Folder Structure
├── src
│   ├── models
│   │   ├── merCollection.ts
│   │   ├── mercenary.ts
│   ├── store
│   │   ├── getters.ts
│   │   ├── index.ts
│   │   ├── mutations.ts
│   │   ├── state.ts
│   │   ├── types.ts
├── test
│   ├── vuex
│   │   ├── getters.test.ts
│   │   ├── mutations.test.ts
We will be creating all of the files one at a time and this is the layout that we will use. There is a bit of future-proofing in that we are splitting the Vuex store into several files from the beginning; also, the unit tests are in a vuex subfolder and broken into separate files by the piece of the store being tested.
Initial Interfaces
TypeScript uses interfaces to describe the shape of data. We'll utilize two of these to get us to the minimum testable state store.
src/models/mercenary.ts
export interface Mercenary {
  role: "Protector" | "Fighter" | "Caster";
  rarity: "Rare" | "Epic" | "Legendary";
  tribe?: "Beast" | "Blood Elf" | "Demon" | "Draenei" | "Dragon" | "Dwarf" | "Elemental" | "Gnome" | "Half-Orc" | "High Elf" | "Human" | "Murloc" | "Night Elf" | "Orc" | "Pirate" | "Tauren" | "Troll" | "Undead";
  attack: number;
  health: number;
  abilities: { [name: string]: any };
  equipment: { [name: string]: any };
  tasks: any[];
}
The initial data model is a very simplistic view of what goes into a Mercenary in Hearthstone. All of the fields are required except for Tribe (Gruul is the only merc without a tribe). If/when HS adds more tribes, we'll need to add them here. The same goes for role and rarity, though it is very doubtful these will ever change.
In future steps, we will expand out the abilities, equipment, and tasks properties of the mercenary.
src/models/mercCollection.ts
import { Mercenary } from "./mercenary";

export interface MercCollection {
  [name: string]: Mercenary;
}
The whole mercenary collection is an object of an arbitrary number of Mercenary objects with their name as the key/property. I debated doing this as an array, but found that the application would need to retrieve mercenaries by key/name, which would have meant iterating over the array every time the app needed to fetch a specific record.
Minimum Testable State Store
Vuex tutorials often have the following objects all crammed into one file that defines the state and store. However, any application will quickly grow to the point where it will need to be refactored for readability, so we are starting at that level of code splitting. The next growth stage of an application would be to refactor into modules, but since this is a single-purpose application, we may never need to go that far.
src/store/state.ts
import { MercCollection } from "../models/mercCollection";

export interface State {
  mercenaries: MercCollection;
}

export function state(): State {
  return {
    mercenaries: {},
  };
}
The global state object, at this very early stage of construction, has a single property called mercenaries which is a MercCollection. The creation of a Vuex store takes a function that returns an object, which we are defining as a State.
src/store/getters.ts
import { MercCollection } from "../models/mercCollection";
import { State } from "./state";

export default {
  getMercenaries(state: State): MercCollection {
    return state.mercenaries;
  },
};
In this getters.ts file, we will be exporting an object that contains a collection of functions for retrieving values from the State state. This will eventually include filtered getters (i.e. only Protectors) and getters for the user's collection.
src/store/types.ts
export const SET_MERCENARIES = "set_mercenaries";It took me a long time to understand the point of this file and the reason for having something so seemingly pointless be created from the beginning. Since committing state changes requires passing the string name of the mutation into Vuex, extracting the name out to a strongly typed set of values allows for Intellisense and TypeScript validation support. The actual string value of "set_mercenaries" should never be seen anywhere in the code base.
src/store/mutations.ts
import { MercCollection } from "../models/mercCollection";
import { State } from "./state";
import { SET_MERCENARIES } from "./types";

export default {
  [SET_MERCENARIES](state: State, mercenaries: MercCollection) {
    state.mercenaries = mercenaries;
  },
};
Much like the getters, the mutations file exports an object that contains all of the ways data changes can be committed to the state. For this first mutation, SET_MERCENARIES (which we know becomes "set_mercenaries") accepts a MercCollection and assigns it to the correct property in the state parameter.
In actual code that we will use in the future, a commit looks like this:
const mercs: MercCollection = {}; // load the collection
this.$store.commit(SET_MERCENARIES, mercs); // commit to state
We'll dig deeper into this when we build out the data loader, though.
src/store/index.ts
import { createStore, useStore } from "vuex";
import getters from "./getters";
import mutations from "./mutations";
import { state, State } from "./state";

export const store = createStore<State>({
  state,
  getters,
  mutations,
});

export function getStore() {
  return {
    store: useStore(),
  };
}
Unit Tests!
Test driven development has plenty of criticisms and I'm not going to get into the pros/cons of strict TDD. I find having unit tests to be extremely useful to validating code without having to build the front-end components to see if something works. Typically, I will take a first pass at the code, then write some tests, which inevitably reveal some bugs, and then fix my code. Now that we have built a simple create and read, so let's validate it works.
yarn add -D vitest happy-domThis project uses a bleeding edge, "this is in development, don't use this in production" testing library called "vitest". Vitest is built on top of Vite, thus minimizing the differences between development, production, and testing environments. It is a wonderful approach to testing and has been a delight to work with. Vitest uses Jest's/Chai's grammer for writing tests, so if you are familiar with either of those, this will seem identical.
tests/vuex/getters.test.ts
import { describe, expect, it } from "vitest";
import getters from "../../src/store/getters";
import { State } from '../../src/store/state';

describe('Mercenary Data Getters', () => {

    it('gets mercenaries collection', () => {
        // Arrange a mock State
        const state: State = {
            mercenaries: {
                "Alexstrasza": {
                    role: "Protector",
                    rarity: "Rare",
                    tribe: "Dragon",
                    attack: 10,
                    health: 80,
                    abilities: {},
                    equipment: {},
                    tasks: []
                }
            }
        };

        // Act out the getter function
        const result = getters.getMercenaries(state);

        // Assert the expected results
        expect(result).deep.equal({
            "Alexstrasza": {
                role: "Protector",
                rarity: "Rare",
                tribe: "Dragon",
                attack: 10,
                health: 80,
                abilities: {},
                equipment: {},
                tasks: []
            }
        });
    });
});
There's a lot going on here, so let's take it from the top. First come the imports:
expectis an assertion method that is used to validate results of operationsgettersis the object that has all of the ways to retrieve data from thestate- We will be creating a mock
Statestate to validate data retrieval
The describe function creates a "suite" (in Vitest parlance) of tests which all have the same context. A test is created with a call to it and a callback function with the actual testing logic.
Following the Arrange, Act, Assert testing pattern, we first create the objects required to run the function under test. Next we execute the method and capture the result. Finally, we check that the result matches our expectations. The Vitest library's expect takes the result of the act portion and begins the function chain to assert the values. We call deep to say we want to scan all nested properties of the result and then equal states that the result needs to match the comparing object.
Minimum Passing Test
We're almost there! Just need to set-up the tooling and we'll see our test passing.
package.json
    "scripts": {
        "dev": "vite",
        "build": "vite build",
+       "test": "vitest"
    }
This adds a new command for yarn to execute, which kicks off a vitest process. When the command launches, it scans the test files, runs the tests, and watches the test files and source files for changes. When changes are made to these watched files, vitest will rerun the appropriate tests. It's like Hot Module Replacement for tests!
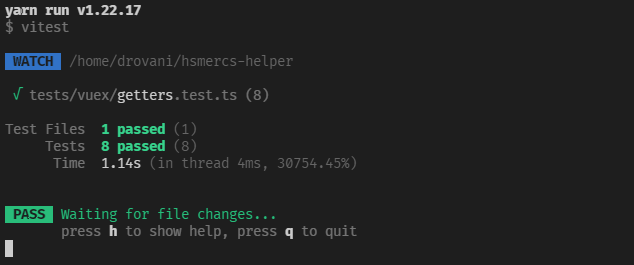
yarn testThe one test we created should now be passing.

tests/vuex/mutations.test.ts
import { describe, expect, it } from "vitest";
import mutations from "../../src/store/mutations";
import { State } from '../../src/store/state';
import { SET_MERCENARIES } from '../../src/store/types';

describe('Mercenary Data Mutations', () => {
    it('sets mercenaries collection', () => {
        // Arrange an initial state
        const state: State = { mercenaries: {} };

        // Act out the mutation commit
        mutations[SET_MERCENARIES](state, {
            "Alexstrasza": {
                role: "Protector",
                rarity: "Rare",
                tribe: "Dragon",
                attack: 10,
                health: 80,
                abilities: {},
                equipment: {},
                tasks: []
            }
        });

        // Assert that the object was assigned to the state
        expect(state.mercenaries).deep.equal({
            "Alexstrasza": {
                role: "Protector",
                rarity: "Rare",
                tribe: "Dragon",
                attack: 10,
                health: 80,
                abilities: {},
                equipment: {},
                tasks: []
            }
        });
    });
});
After the explaination of the getters test, the mutation is just as straightforward.
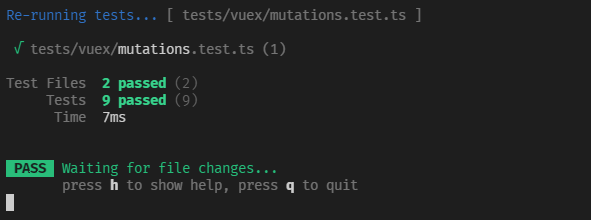
yarn test
Step 3: First Rudimentary Mercenary Components
With a central state store in place, we will now import the JSON data; and since we will have real data, we will then build the initial round of components to render it.